As long as I can remember, I’ve always had a passionate interest in two things: computers, and cars.
It might come as a surprise then, that I have never fully, until now, explored how modern vehicle CAN bus systems work. I decided I would reverse engineer the CAN network between my cars control modules, I could then use what I have learned to write an application that injects new commands into the network that the car believes is coming from another control module.
I started by buying myself a CAN adapter that was compatible with Linux. canable.io was my choice, I bought a cheap clone, as the hardware is open-source. It is compatible with the python-can library, and the can-utils set of packages within Linux, so it was perfect for my needs. As it happens, I already have a Raspberry Pi 5 with HDMI wired into my Pioneer head unit, so I will use this as the basis to run the code for the project, don’t ask…
I now needed to do some research into how to connect to my cars specific CAN bus. I determined via this forum post and this website, that I could access the CAN bus on OBD pins 6 and 14, for CAN HIGH and CAN LOW, at a data rate of 500kbps.
I connected the canable to my Pi and ran the below command, this listens on the network via the can0 interface:
sudo cansniffer can0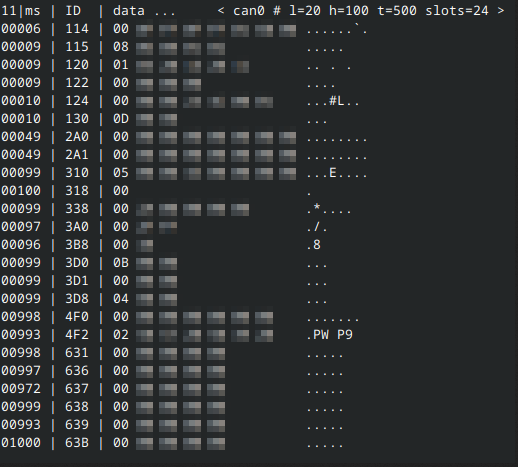
Success! The Canable was listening on the network, and I could now see packets flowing through the network. (I have blurred the majority of the above image as it is quite possible that it contains my VIN number in hex format)
It’s important to note that on a CAN network, each message has an ID that tells other modules what the message is for, followed by bits of information that can be anything such as an unlock command, steering wheel position, speed, throttle position, engine temperature. The list goes on…
It turns out that my Suzuki is actually pretty basic by modern standards, and I believe most buttons within the car, (I.e window switches, headlights etc), are all controlled directly via the physical switch and a relay which opens the circuit. The body control module does seem to report on the network, and I was able to make the gauge cluster believe the lights are on by replaying that constant “lights on” packet, however when I stepped outside the car they were still off, the switch has to be in the physical on position for the lights to switch on. I would love to explore a modern BMW or VW in the future, however my simple and older Japanese cars do not have the same amount of computerization!
Finding CAN ID’s and messages is simply a case of running CAN sniffer, and opening doors, pressing buttons etc, and seeing what data changes. I found the below ID’s and data for my Suzuki, I would imagine this applies to most Suzukis built 2000-2015.
3D8#000500 - All Doors lock - Send once to toggle dome light (for some reason??)
3D8#000100 - All Doors unlock
3D8#000200 - Driver door unlock

3D8#000501 - Door Lock with single hazards
3D8#000202 - Door unlock with double hazards
3D8#000020 - Start door buzzer
3D8#000000 - Stop door buzzer

3D8#000001 - 3D8#000002 repeatedly = flash hazards

Fairly certain that ID 3D8 is the Body Control Module mounted under the dashboard.
For our ultimate goal of writing a demo application that is able to inject commands into the network, I would use python, with the Flask library, to create a webapp with buttons that would run commands. The canable adapter also has a python library with documentation.
The code I wrote is as follows:
from flask import Flask
from flask import request, render_template
import requests
import can

interface = "socketcan"
channel = "can0"

# Comment out below if using socketCAN
bus = can.Bus(channel=channel, interface=interface)

# Uncomment below if using slcan interface
#bus = can.interface.Bus(bustype="slcan", channel="/dev/ttyACM0", bitrate=500000)

app = Flask(__name__)

@app.route("/", methods=["GET", "POST"])
def index():
    if request.method == "POST":
        if request.form.get("unlockDriverDoor") == "Unlock Driver Door":
            print("[!] Unlocking Doors")
            requests.post("<NTFY URL HERE>",data="🔓 ZC31S Doors Unlocked".encode(encoding='utf-8'))
            msg = can.Message(arbitration_id=0x3D8, data=[0, 2, 2], is_extended_id=False)
            try:
                bus.send(msg)
                print("[*] Driver Unlock Command Sent")
            except can.CanError:
                print("[*] Message Error")

        elif request.form.get("unlockDoors") == "Unlock Doors":
            print("[!] Unlocking Doors")
            requests.post("<NTFY URL HERE>",data="🔓 ZC31S Doors Unlocked".encode(encoding='utf-8'))
            msg = can.Message(arbitration_id=0x3D8, data=[0, 1, 2], is_extended_id=False)
            try:
                bus.send(msg)
                print("[*] Unlock Command Sent")
            except can.CanError:
                print("[*] Message Error")

        elif request.form.get("lockDoors") == "Lock Doors":
            print("[!] Locking Doors")
            requests.post("<NTFY URL HERE>",data="🔐 ZC31S Doors Locked".encode(encoding='utf-8'))
            msg = can.Message(arbitration_id=0x3D8, data=[0, 5, 1], is_extended_id=False)
            try:

                print("[*] Unlock Command Sent")
            except can.CanError:
                print("[*] Message Error")

        elif request.form.get("hazardFlashers") == "Hazard Flashers":
            print("[*] Activating Hazard Lights")
            requests.post("<NTFY URL HERE>",data="⚠ ZC31S Hazard Lights Toggled".encode(encoding='utf-8'))
            msg = can.Message(arbitration_id=0x3D8, data=[0, 0, 2], is_extended_id=False)

        else:
            pass
    return render_template("index.html")
This enabled me to control the locks and flash the hazard lights remotely from a mobile device on the same network. I recorded a demo here where I unlock the drivers door using the webapp running locally on the Pi: