Recently, I’ve been looking into how to improve my networks security. I have come up with 3 simple ways to easily improve your networks security:
1. Setting up an SSH jumpbox
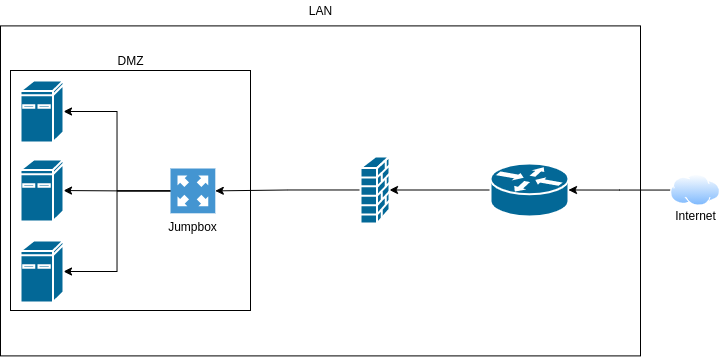
One of the only points into my network is via SSH into my web server, this server kind of acts as a jump box already, as I can SSH into my other Linux hosts via password auth, but this isn’t very secure. After some research, I found it was common to have a dedicated Linux host whos only purpose is to “jump” to other machines.
So I started by spinning up a virtual machine, with 1 core, 4GB of RAM and 16GB of storage, running Ubuntu Server 20.04.2LTS, plenty of power for this purpose.
From there, I assigned a static IP and SSH’d in on my computer on the same network.
Now I’m going to go through some important setup.
First, on your local machine, run:
$ ssh-keygenThis will create 2 files in “~/.ssh/”, these are your public and private keys. Do not let your private key leave this computer. With this key, people will be able to access your jump box, think of it as a long, fancy password.
Now on your jump box, we need to add your public key, make sure you are not logged in as root, and preferably make a user without sudo for security. (However, you will need root/sudo for this setup, im assuming you have two separate, non-root users, one with sudo, and one without.)
Now you need to paste the contents of “~/.ssh/id_rsa.pub” from your local computer to “~/.ssh/authorized_keys” on your jump box.
First, on your local computer, run:
$ cat ~/.ssh/id_rsa.pubCopy the output of this, and on your jump box run:
$ vim ~/.ssh/authorized_keysThis will open a file in vim, you can paste keys on each line, and each key will let you into the server, so I will be repeating the above steps for both my laptop, desktop, and phone (Termbot SSH client).
Once you are done, save the file and then on the jump box, run:
$ sudo vim /etc/ssh/sshd_configIn this file, make these edits:
# Change
#PermitRootLogin prohibit-password
# to
PermitRootLogin no
# and change
#PasswordAuthentication yes
# to
PasswordAuthentication no
This prevents the root user logging in via SSH, and makes it so that we can only login using the keys we added earlier.
Now run:
$ sudo systemctl restart sshdThis restarts SSH, enabling the changes we just made.
If you want, you can also install fail2ban, this “bans” IPs from accessing SSH after 3 failed attempts. This isn’t as neccesary with pubkey authentication, but we are trying to make everything as secure as possible, so, you can do this by running:
$ sudo apt update
$ sudo apt install fail2ban
$ sudo systemctl start fail2ban
Now that everything is secured on the actual authentication side of things, we can forward our SSH port to the internet. Depending on your router/firewall, this process can differ, but it usually consists of finding a page called “port forwarding,” and forwarding port 22 to the IP address of your server, i’m running OPNsense, and the process is as follows:
Copy the output of this, and on your jump box run:
$ vim ~/.ssh/authorized_keysThis will open a file in vim, you can paste keys on each line, and each key will let you into the server, so I will be repeating the above steps for both my laptop, desktop, and phone (Termbot SSH client).
Once you are done, save the file and then on the jump box, run:
$ sudo vim /etc/ssh/sshd_configIn this file, make these edits:
# Change
#PermitRootLogin prohibit-password
# to
PermitRootLogin no
# and change
#PasswordAuthentication yes
# to
PasswordAuthentication no
This prevents the root user logging in via SSH, and makes it so that we can only login using the keys we added earlier.
Now run:
$ sudo systemctl restart sshdThis restarts SSH, enabling the changes we just made.
If you want, you can also install fail2ban, this “bans” IPs from accessing SSH after 3 failed attempts. This isn’t as neccesary with pubkey authentication, but we are trying to make everything as secure as possible, so, you can do this by running:
$ sudo apt update
$ sudo apt install fail2ban
$ sudo systemctl start fail2ban
$ sudo systemctl enable fail2ban
Now that everything is secured on the actual authentication side of things, we can forward our SSH port to the internet. Depending on your router/firewall, this process can differ, but it usually consists of finding a page called “port forwarding,” and forwarding port 22 to the IP address of your server, i’m running OPNsense, and the process is as follows:
- Login to your router/firewalls web interface. This is usually the same format as your computers local IP, but with a “1” on the end, my subnet is “192.168.55.0/24” so my web interface is located at “https://192.168.55.1”. Now login, and find the port forwarding page
- Add a rule/port forward. Press the add button and fill in the correct info for your port forward, mine is as follows:
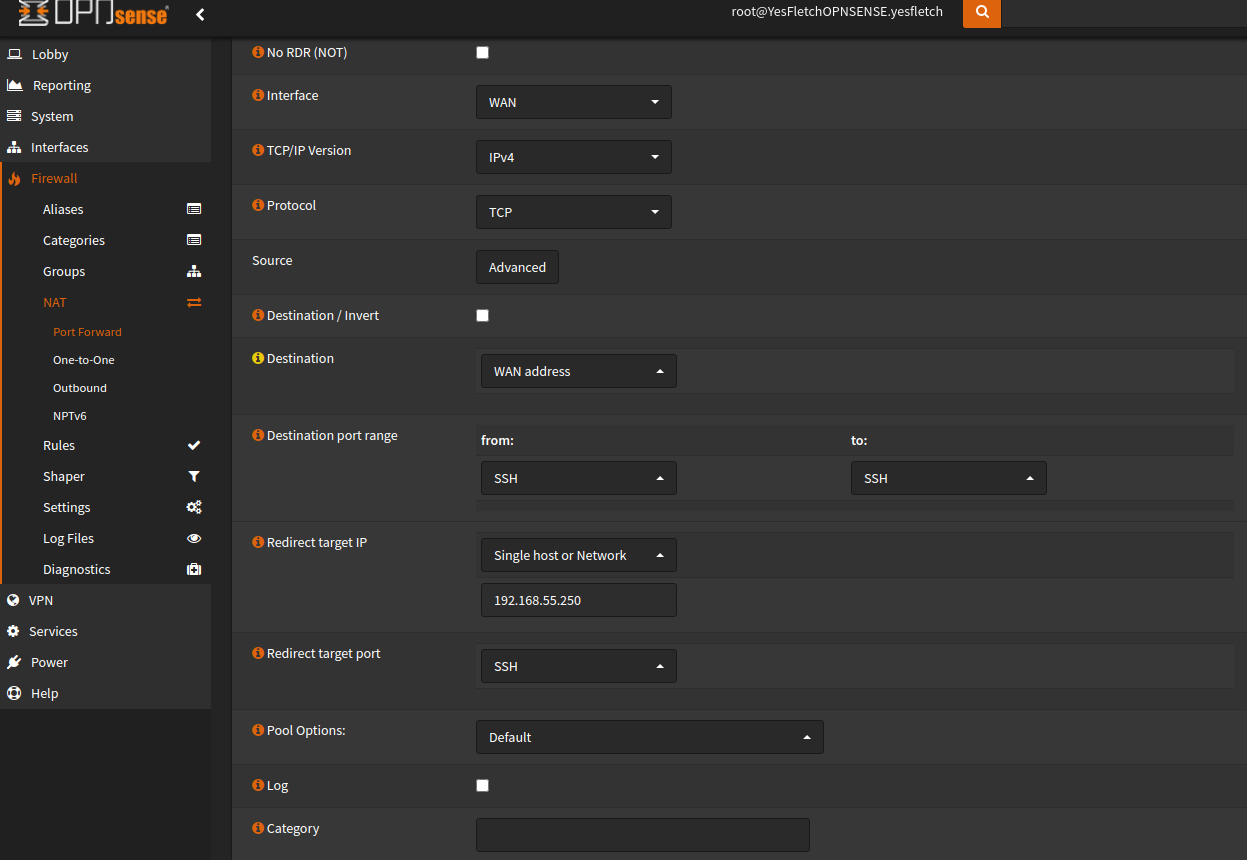
Now save the rule, and you should now able to access your jump box from outside of your network.
Now we need to actually harden the jump box itself. I’m going to start by upgrading all packages:
$ sudo apt update
$ sudo apt upgrade
# Reboot for good measure
$ sudo reboot
When the system comes back up, reconnect, and we need to start adding SSH keys to the servers you want to jump to.
So, for example, on my webhost server, I open the authorized_keys file:
$ sudo vim ~/.ssh/authorized_keysIn this file, I paste the contents of ~/.ssh/id_rsa.pub from the jump server, effictively what we are trying to do is restrict ALL SSH traffic to the jump server. The jump server acts as a CNC (“command and control”) server for all other servers and computers running SSH.
Now we edit the SSH config, the same way as before, disabling password and root login.
After that, you should restrict SSH connections to the jumpbox. So open the file “/etc/hosts.deny”:
$ sudo vim /etc/hosts.denyAdd the following:
# /etc/hosts.deny
sshd: ALL
And now we allow just the jump server:
$ sudo vim /etc/hosts.allow# /etc/hosts.allow
sshd: 192.168.55.250/24
# Your subnet and IP may differNow only your jump server can connect, and only with the private key that is on the jump server. Repeat this process for as many servers as you please.
I’m now going to add a few firewall rules, which stop the jump server from connecting to the internet entirely, and again restricts SSH connections to only the jump server. I’m not going to show this as it differs from firewall to firewall and would take up too much space in this article!
And thats it for this step! A few notes:
- For added security, close the SSH port on your firewall and instead add a VPN, which sole purpose is to allow you connect to the jump server.
- If you haven’t already figured it out, the only way to connect to other servers via SSH is through the jump server via SSH, this means that you create a ‘tunnel’ through the jump server.
- Ideally, if you know you wont need to access the server from the outside, you can close the SSH port, or you can add a schedule on your firewall to open and close your port at certain times of the day, you could even use port knocking to make a “secret knock” to open the port temprarily remotely.
2. Intrusion Detection and Intrusion Prevention
Ok, this one is completely unneccesary for home networks, but it is a really useful tool in a business environment. First i’m going to gloss over and explain what an IDS and IPS is.
Intrusion Detection System (IDS):
An Intrusion Detection System, first of all, does not serve the same purpose as a firewall, most of the time the IDS lives on the firewall, which can add to the functionality of your firewall, but it is not a firewall in itself.
An IDS’s purpose is to analyze and detect malicious traffic. It usually does this by checking packet signatures against a list of rules which are known to be malicious traffic.
Intrusion Prevention System (IPS):
An Intrusion Prevention System does everything an IDS does, but also prevents intrusion by usually blocking source and/or destination IP addresses. Most IDS’s have an “IPS” mode which can be enabled.
Setup:
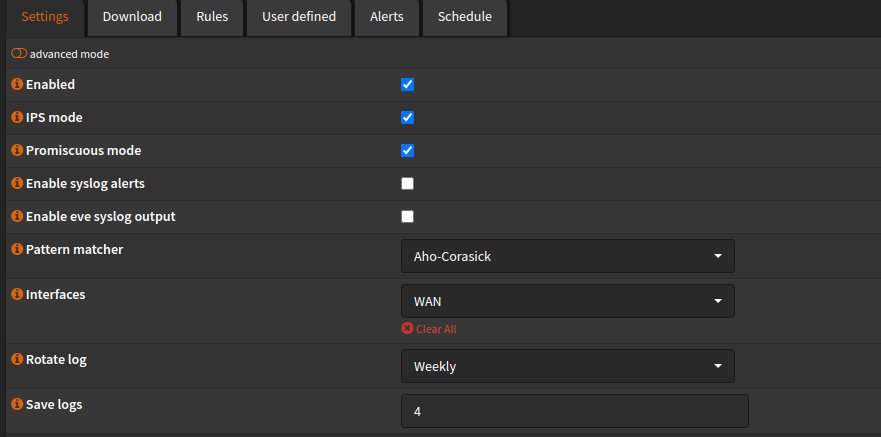
To setup my IPS, I’m going to be installing suricata on my existing OPNsense firewall. I chose suricata because of it’s multithreaded performance, due to all that packet analysis, an IDS/IPS can slow your network down (especially on my older PowerEdge R610 server, due to its poor single thread performance!) However, thanks to multi-threading there is no difference with suricata, I still get my full 150/30 bandwidth performance. However, I also recommend snort, which just newly introduced threading too in its latest version.
So first, I installed the suricata package from the official OPNsense repository:

After installation, go to “Services -> Intrusion Detection -> Administration” and choose your desired settings, mine are as follows:
Now go to “Download” and choose the rule sets you wish to download, I’m not going to go over this though, however I highly recommend this video for explanation and this video for in-depth setup by Lawrence Systems on YouTube.
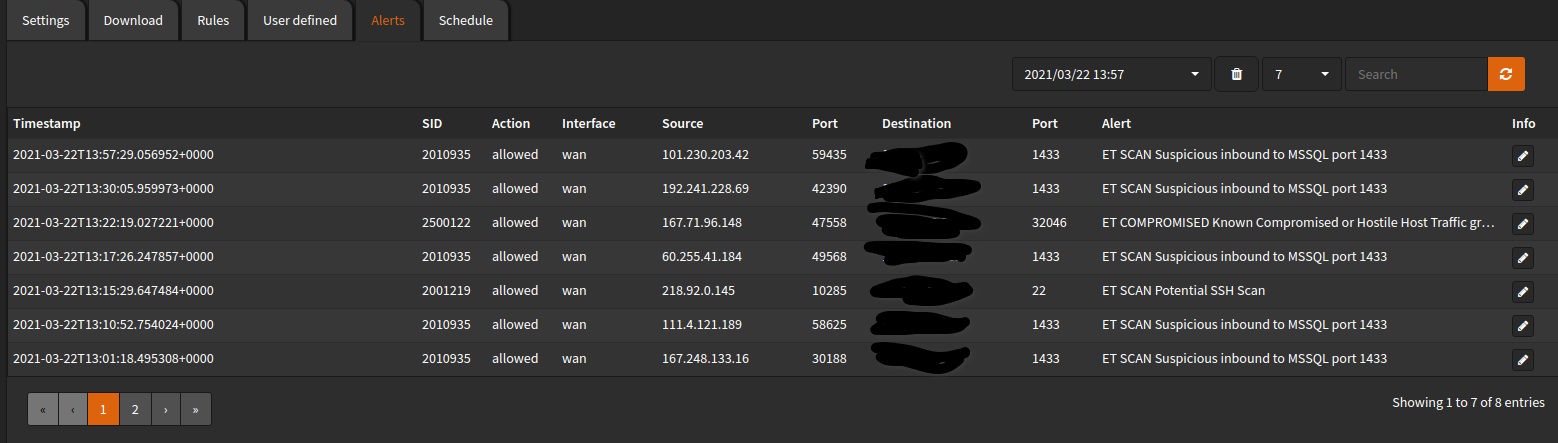
After you are done, head over to alerts, and you will see a log of all alerts that have been triggered, 99.99% of the time these are going to be bots which are attemptint to access your network. Its even picking up on inbound ports which aren’t even open!
And that’s it for Network Intrusion Detection.
3. Patch Everything!
This one of the most important things you can do, especially with internet facing systems like firewalls or any systems with services exposed. Patching isn’t hard to do, takes little time and prevents people gaining access to your network via known exploits. I’m not going to go through how to patch or update everything because you likely already know how to.
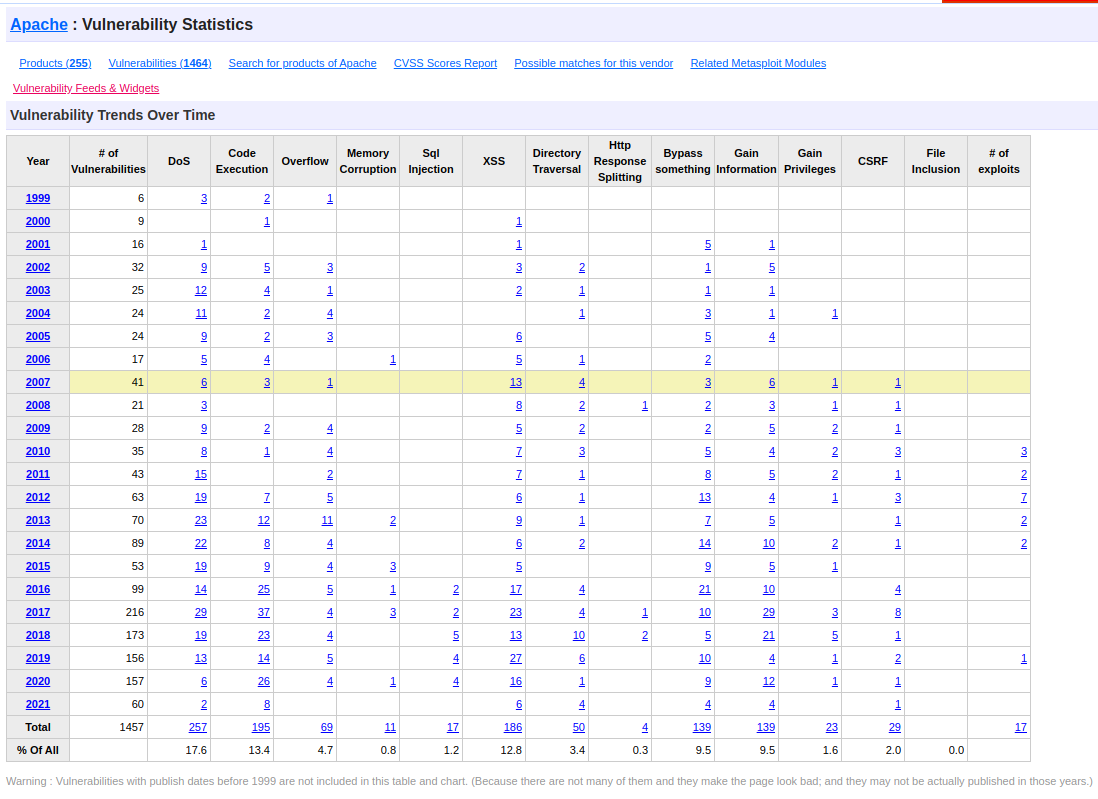
You can find if software you are running is vulnerable on https://www.cvedetails.com/. For example, Apache has had 1457 known CVE’s since 1999 at the time of writing. You can see that DoS vulnerabilities are the most common, followed by Code Execution! This is also why you never run services as root, if an attacker were to find an RCE exploit in apache, they would be dropped into whatever user apache is running as, hopefully for them they will get lucky and the administrator setup Apache to run as root, which means they don’t have to do any more exploitation after gaining a foothold.
Thats it for this post, thank you for reading, and remember to keep your systems secure!
No comment yet, add your voice below!